It all starts with a namewhat's yours?
Choose a domain action

Picture-led walkthrough

Build a professional first website without getting lost in the editor.

We built Prairie Peak Outfitters as a fictional Canadian outdoor retailer so you can see the real workflow, the decisions that matter and the parts you can safely improve later.

Website Builder editor showing the Prairie Peak Outfitters About section and camping gallery
Official SaaSTech Help Centre articlesOpen setup instructions as you work
Build your first Website Builder siteOpen article ↗Choose a theme or templateOpen article ↗Add and customize page sectionsOpen article ↗Add a blog sectionOpen article ↗Improve your website SEOOpen article ↗Accept appointments and eventsOpen article ↗Set up an Online StoreOpen article ↗Publish your Website Builder siteOpen article ↗

Before you begin

Start with the customer, not the controls.

01

Choose one primary goal.

Prairie Peak Outfitters needs visitors to browse trail essentials. The headline, imagery and main button all support that one action.

02

Write for quick scanning.

Use one clear promise, a short supporting sentence and descriptive headings. Save detailed specifications for product pages.

03

Build a complete draft first.

Finish the essential sections before adjusting every colour or font. A complete draft is easier to review than a perfect header attached to an unfinished site.

The working process

From business idea to review-ready draft.

The screenshots below come from the actual SaaSTech Website Builder workspace used for this demonstration.

STEP 1

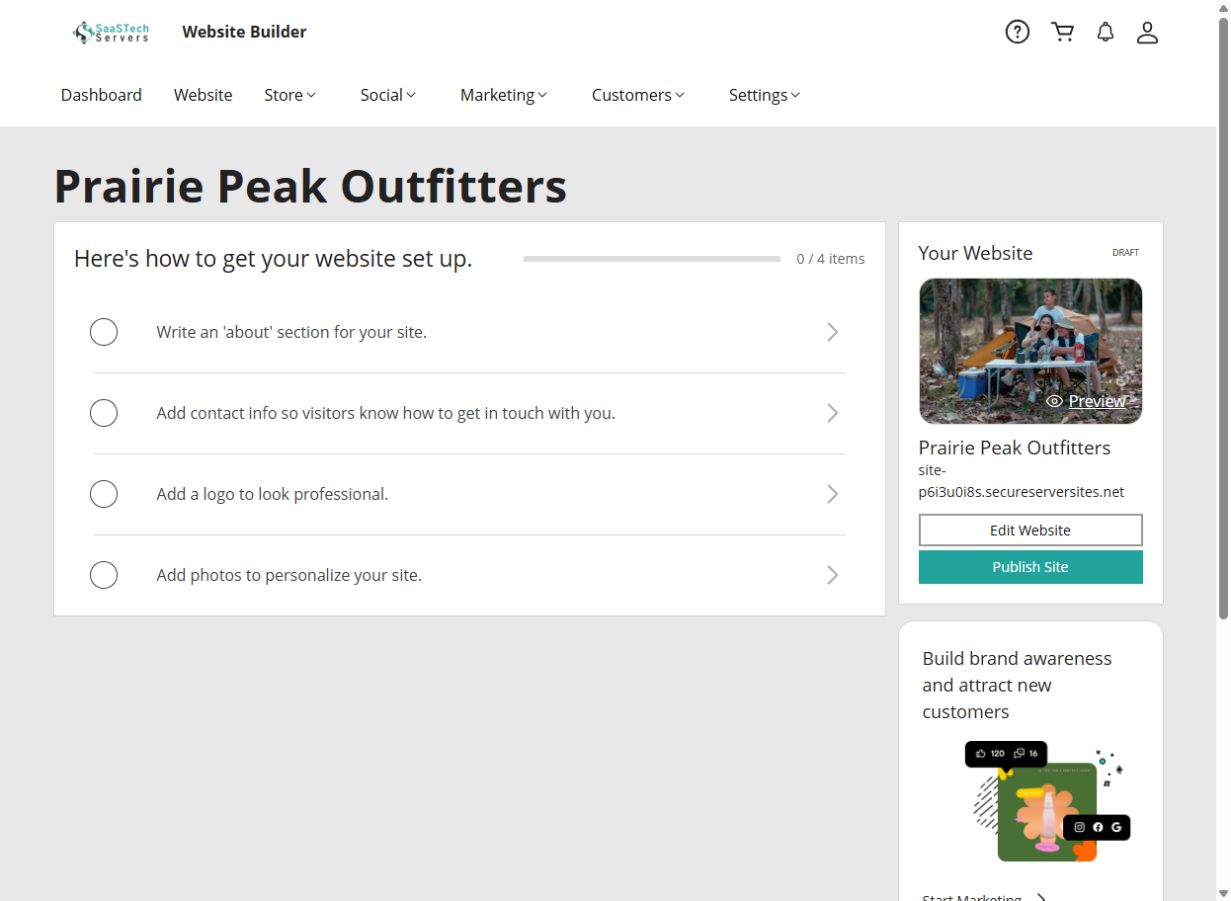
Use the setup dashboard as your checklist.

Add an About section, contact details, a logo and useful photographs. These four items establish identity, trust and a way for customers to act.
  • Use a business name customers will recognize.
  • Keep the site in Draft while you experiment.
  • Preview frequently instead of waiting until the end.
Prairie Peak Outfitters Website Builder dashboard with a four-item setup checklist
The dashboard keeps the essential first-site tasks together.
STEP 2

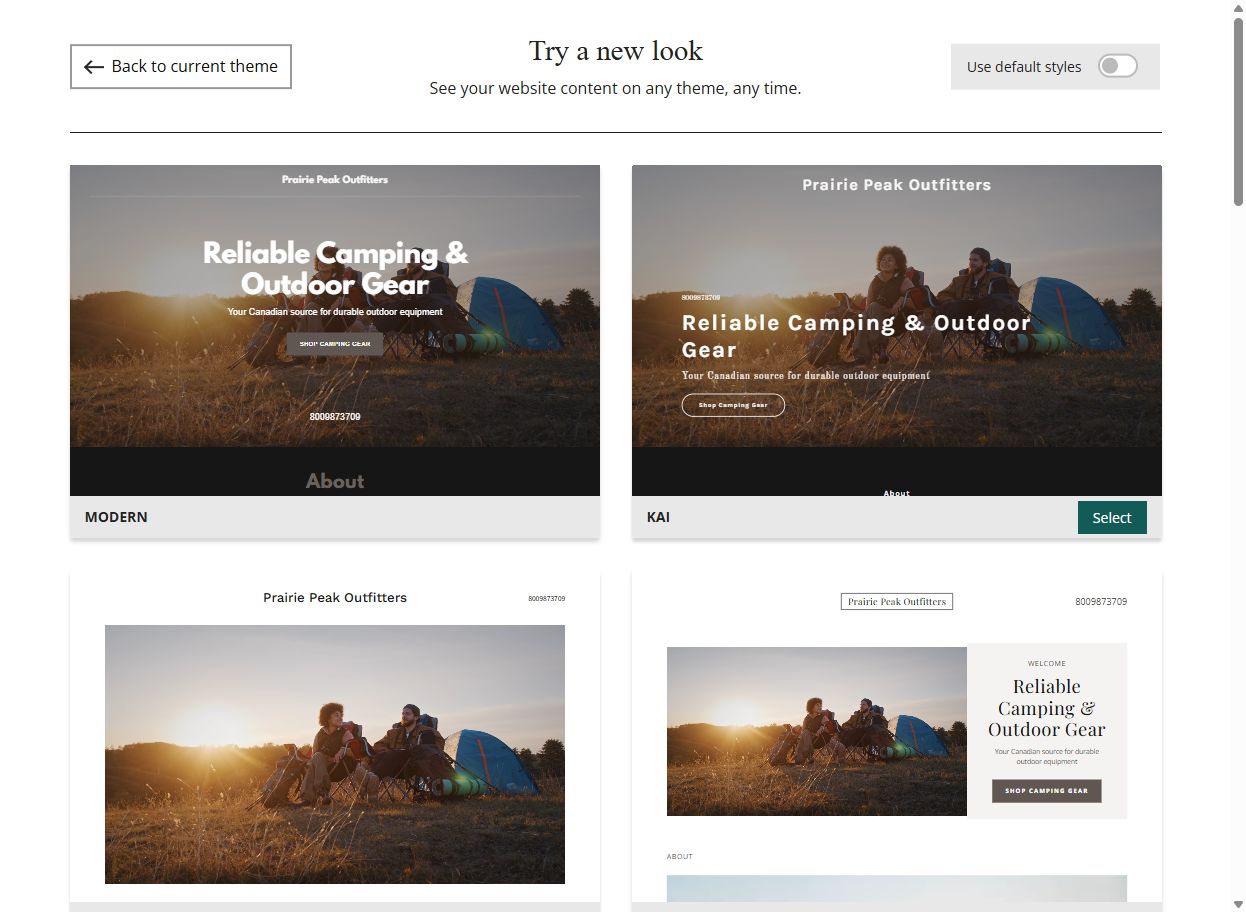
Compare complete templates using your own content.

A template is a starting structure, not a permanent commitment. Preview several layouts and select the one that makes your most important message and action easiest to find.
  • Judge readability before decoration.
  • Check that the mobile layout feels natural.
  • Keep the brand palette to two or three main colours.
Website Builder template gallery comparing the same business content in different designs
Your content stays visible while you explore different designs.
STEP 3

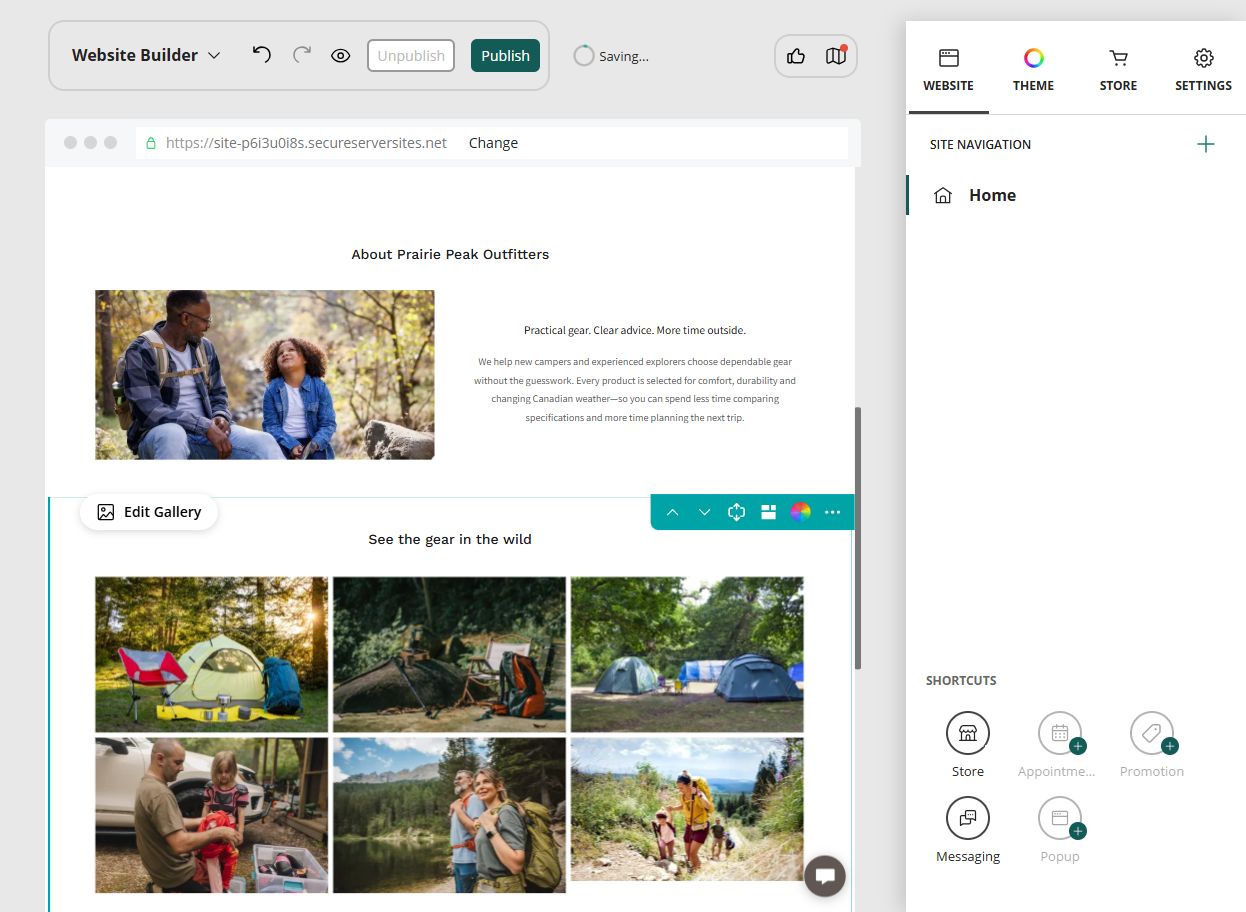
Edit the words directly on the page.

Replace generic text with a specific customer promise. We changed the sample About copy to explain who the store helps, what it selects and why that makes planning easier.

EXAMPLEPractical gear. Clear advice. More time outside.

Benefit-led copy sounds human and gives the visitor a reason to continue.

Visual editor with improved Prairie Peak Outfitters copy and image gallery
Edit in context and see the result immediately.
STEP 4

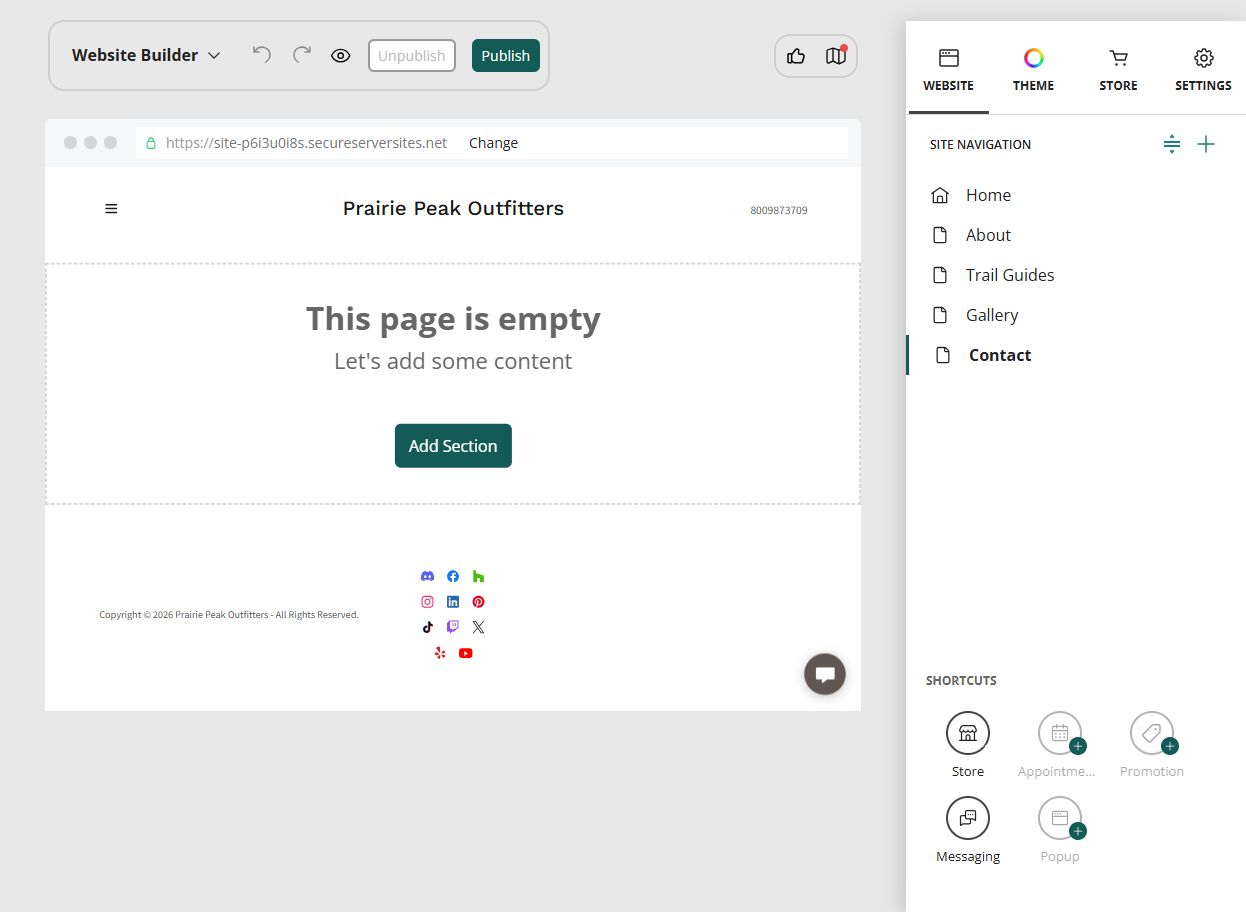
Create the pages before filling every detail.

Use Add Page to create a short, predictable navigation. Prairie Peak Outfitters starts with Home, About, Trail Guides, Gallery and Contact; the online store can be added after the informational pages are ready.
  • Use short page names that fit comfortably on mobile.
  • Keep the most useful customer pages in the main navigation.
  • Avoid adding empty pages that do not have a clear purpose.
Website Builder editor showing Home, About, Trail Guides, Gallery and Contact in Site Navigation
Create the page structure first, then work through one page at a time.
STEP 5

Search for a section that matches the job.

Select Add Section, search by purpose and compare the complete layouts. Choose a structure for the content you need, then replace the example text and media with your own.
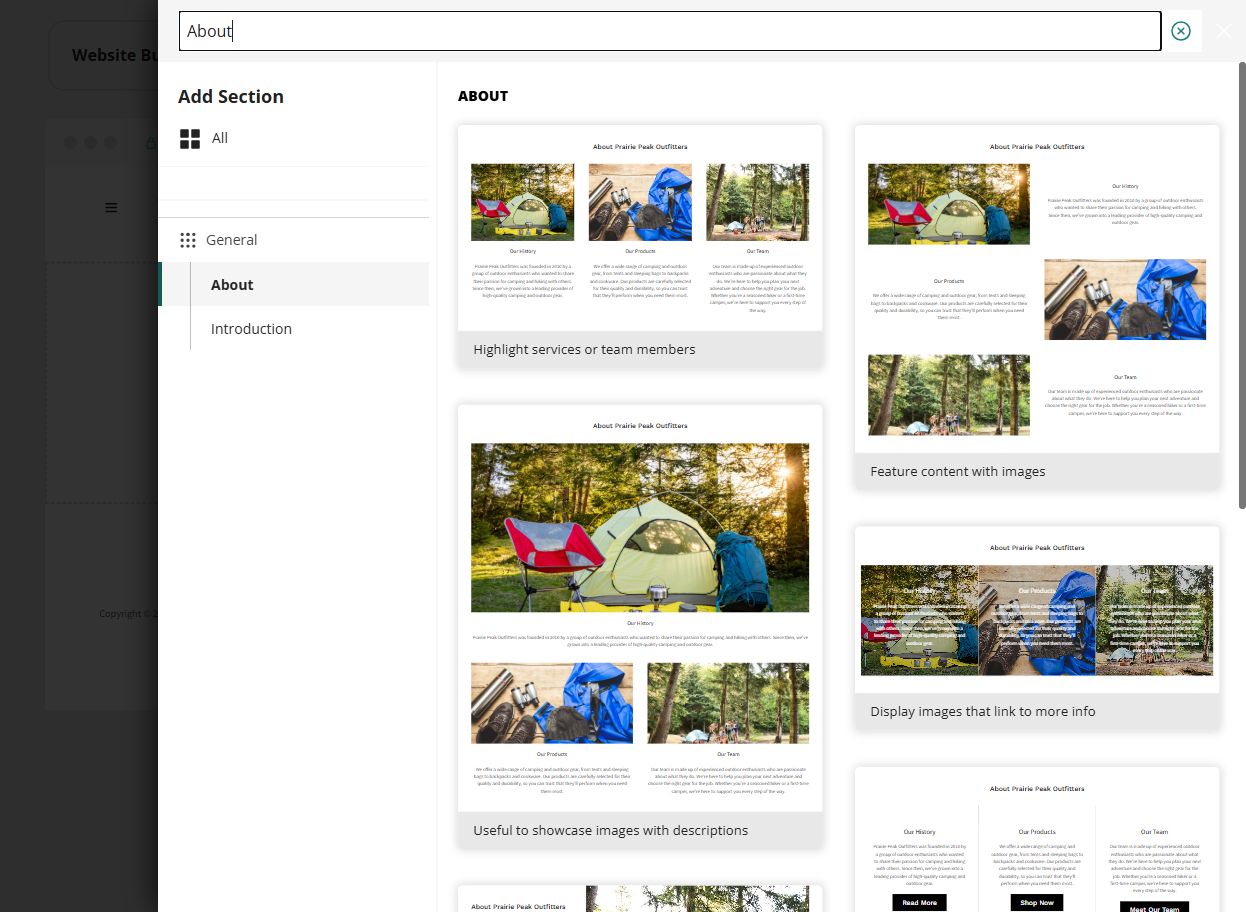
  • Introduction layouts work well at the top of a page.
  • About layouts can present stories, services or guide categories.
  • Image Gallery layouts are best when the pictures carry the message.
Website Builder Add Section panel showing About layout choices
Search narrows the section gallery without limiting later customization.
STEP 6

Add only the sections that help a visitor decide.

The Trail Guides page opens with one clear promise and follows with three visual starting points. Each card describes a real trip instead of using vague labels.
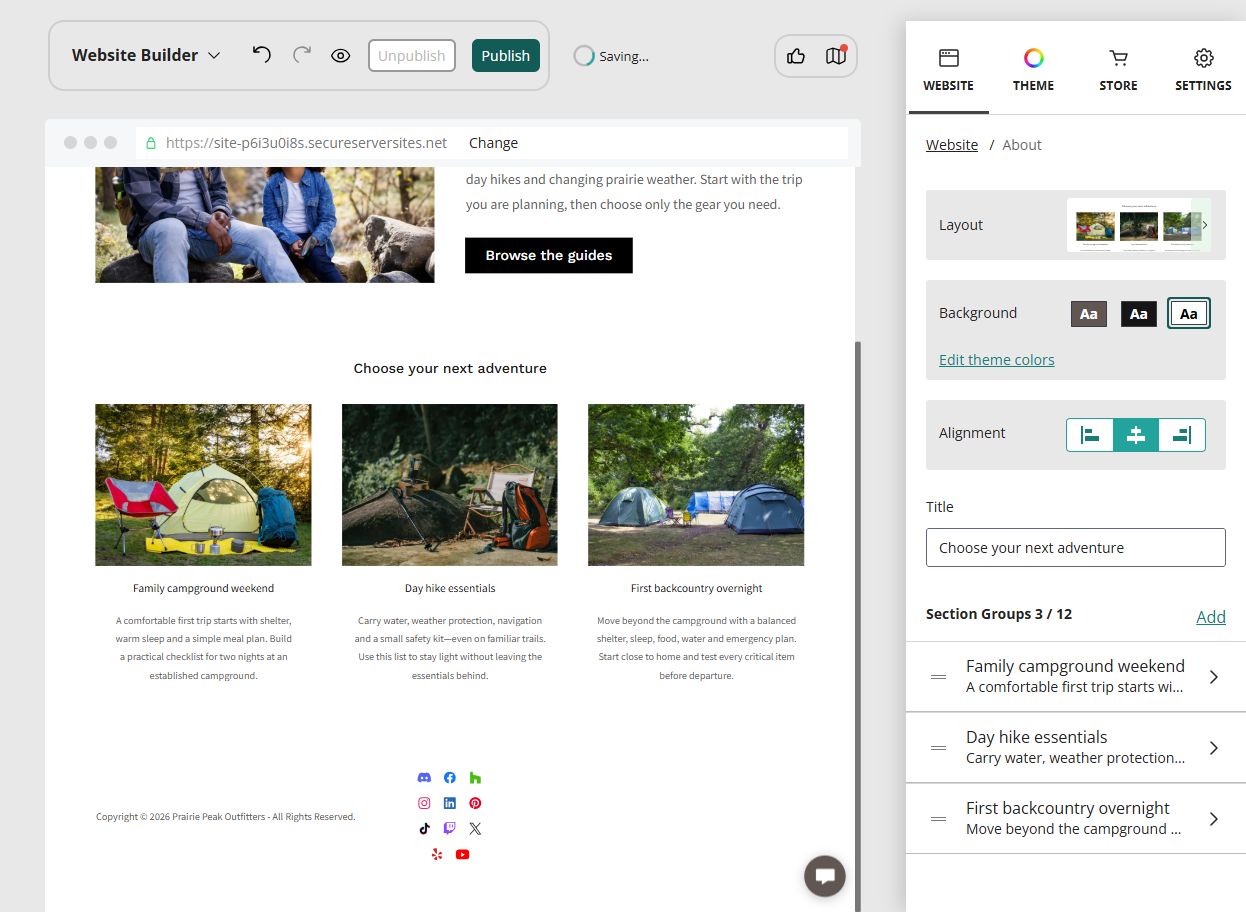
  • What is this page for?
  • Which option matches the visitor?
  • What should the visitor do next?
  • Does each image support the nearby text?
Completed Prairie Peak Outfitters Trail Guides page with three illustrated guide cards
A useful page combines a clear introduction, relevant images and specific choices.
STEP 7

Give every important image a purpose.

Choose a gallery layout that suits the shape of your photographs. Add a short visible caption when context helps the visitor, and add an image description for people using assistive technology or when an image cannot load.
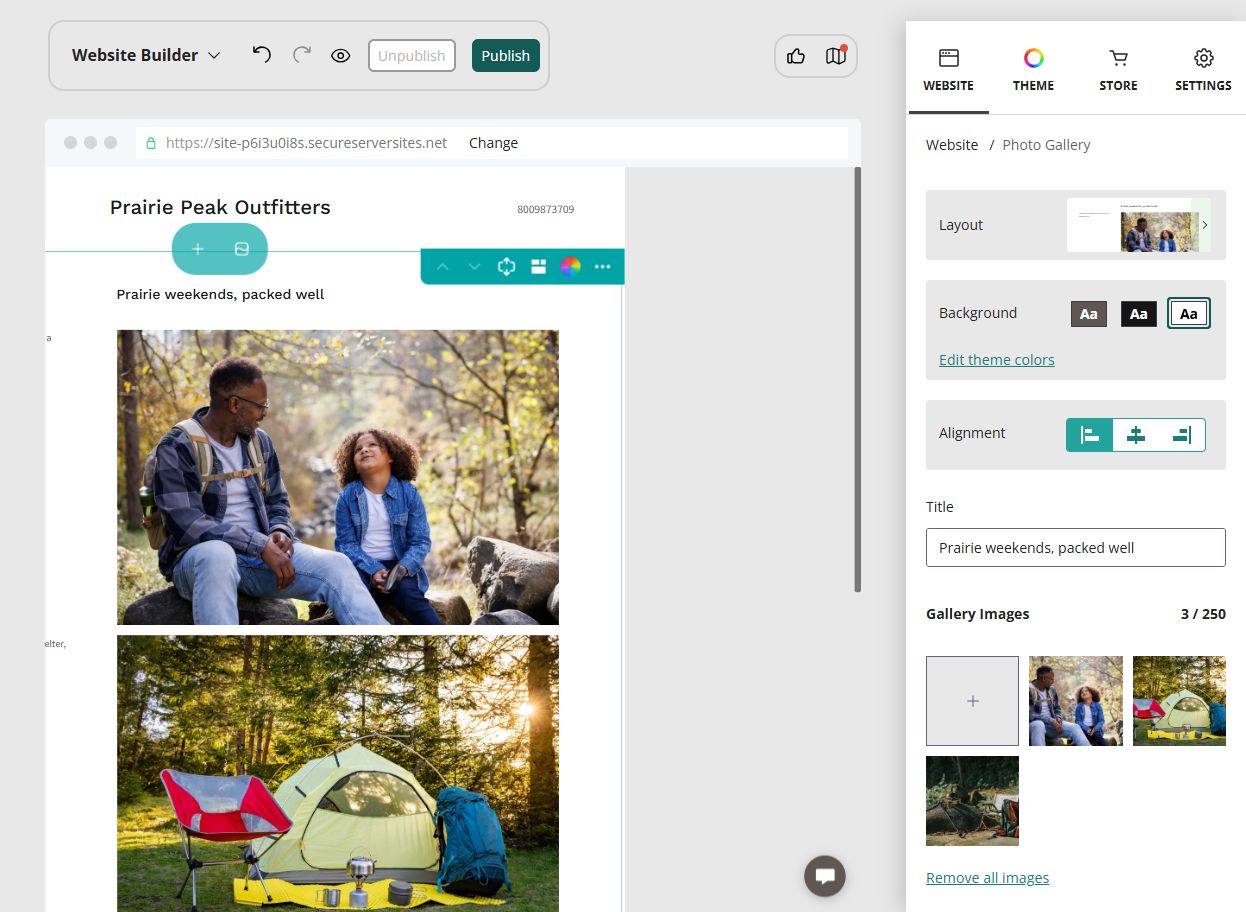
  • Describe what is visible rather than starting with “image of.”
  • Keep captions useful and distinct from alternative text.
  • Check that automatic cropping does not hide the subject.
  • Use sharp, compressed images instead of oversized originals.
Website Builder editor showing a captioned outdoor photo gallery
The gallery pairs relevant photographs with concise captions and meaningful image descriptions.
STEP 8

Make the Contact page useful and trustworthy.

Choose a contact layout that combines a short form with the business details customers may need. Explain what visitors should ask about and when they can expect a reply.
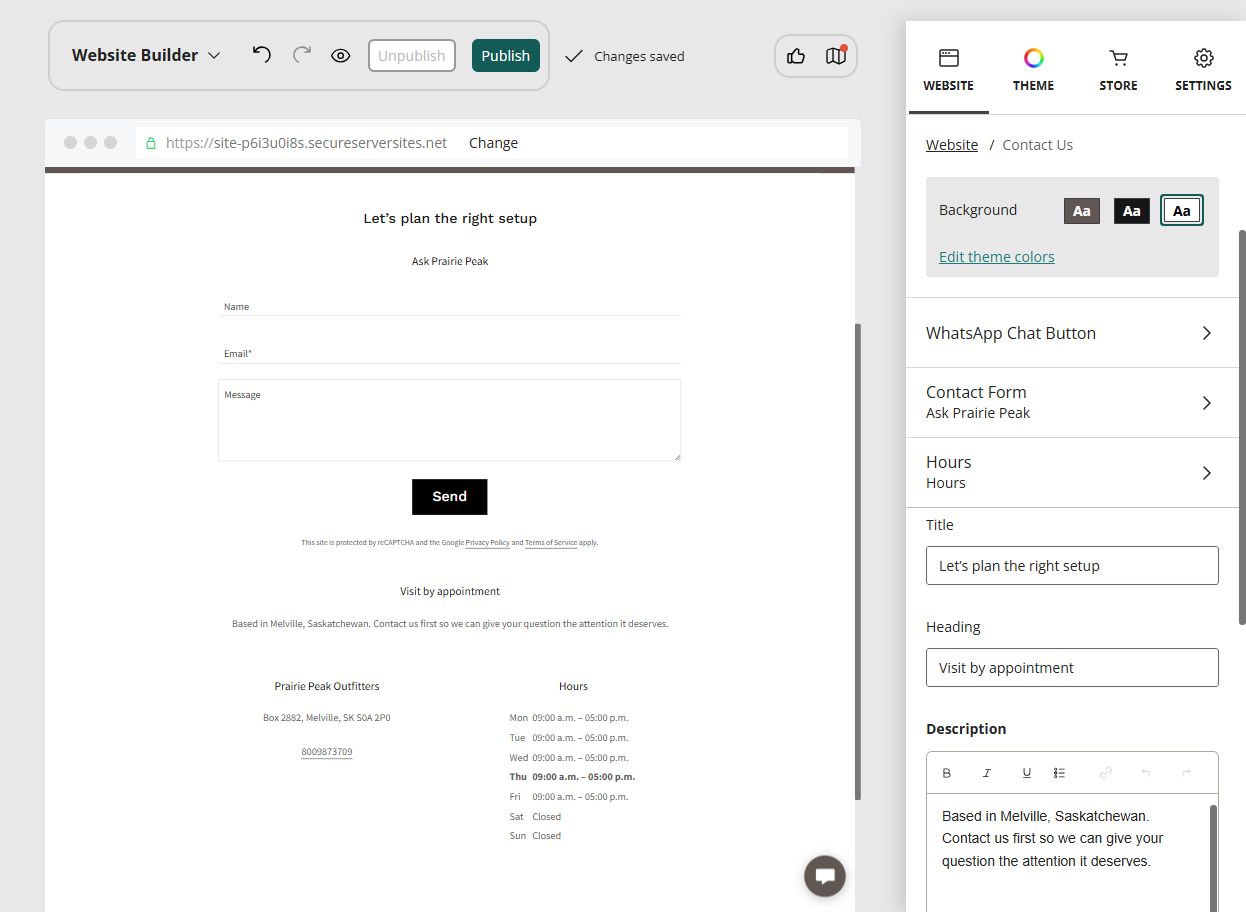
  • Request only the information needed to answer the question.
  • Confirm the form delivers to an inbox you check regularly.
  • Publish an address only if customers are welcome to visit it.
  • Keep business hours, phone numbers and response times accurate.
Website Builder editor showing a completed contact form, appointment note and business hours
A focused form and clear expectations make it easier for customers to get the right help.
STEP 9

Use the blog to answer real customer questions.

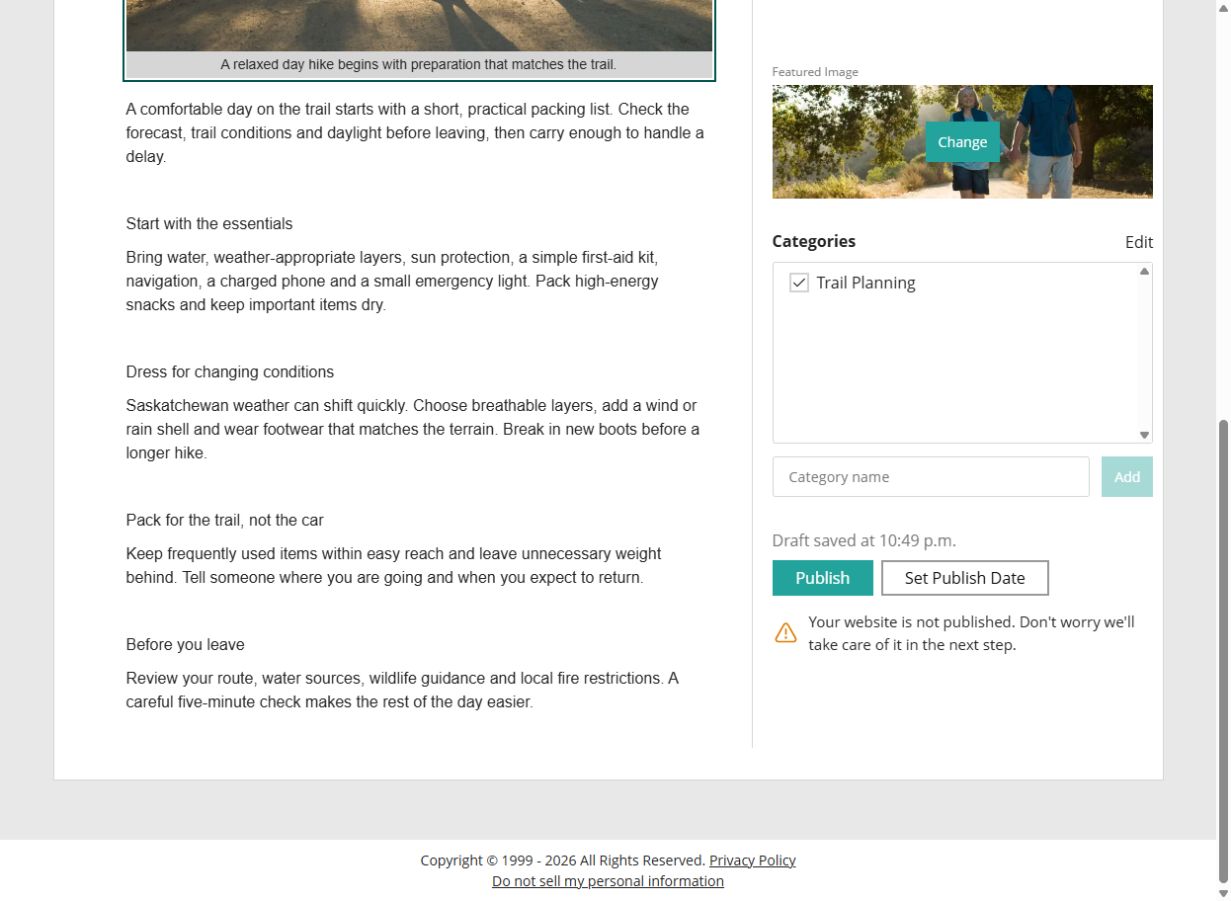
Add a Blog page, choose a readable post layout and write one useful article before worrying about a publishing schedule. Prairie Peak Outfitters begins with “What to Pack for a Saskatchewan Day Hike.”
  • Use a specific title that promises a useful answer.
  • Break the article into short sections with descriptive headings.
  • Add a relevant featured image, caption and accessibility description.
  • Assign a clear category so related articles are easier to browse.
  • Keep the post as a draft until its facts, links and mobile layout are checked.
Website Builder Blog editor showing a Saskatchewan day-hike article with a featured image and Trail Planning category
A strong first post answers one practical question and demonstrates the value of the business.
STEP 10

Preview before you publish.

Review the draft as a customer—not as its creator. Test every button, check phone and tablet layouts, proofread prices and contact details, and confirm that forms reach the correct inbox.

  • Use descriptive page titles and one main heading per page.
  • Add meaningful alternative text to important images.
  • Compress large photos and avoid text baked into images.
  • Complete payments, tax, shipping and a test order before launching a store.
READY-TO-PUBLISH CHECK

Business plan

Help customers find you and pay for a simple service.

The Business plan builds on the complete Personal-plan website with page-by-page SEO controls and PayPal buttons. It suits service businesses that are not ready for a full product catalogue.

BUSINESS 1

Write a useful search title and description for every page.

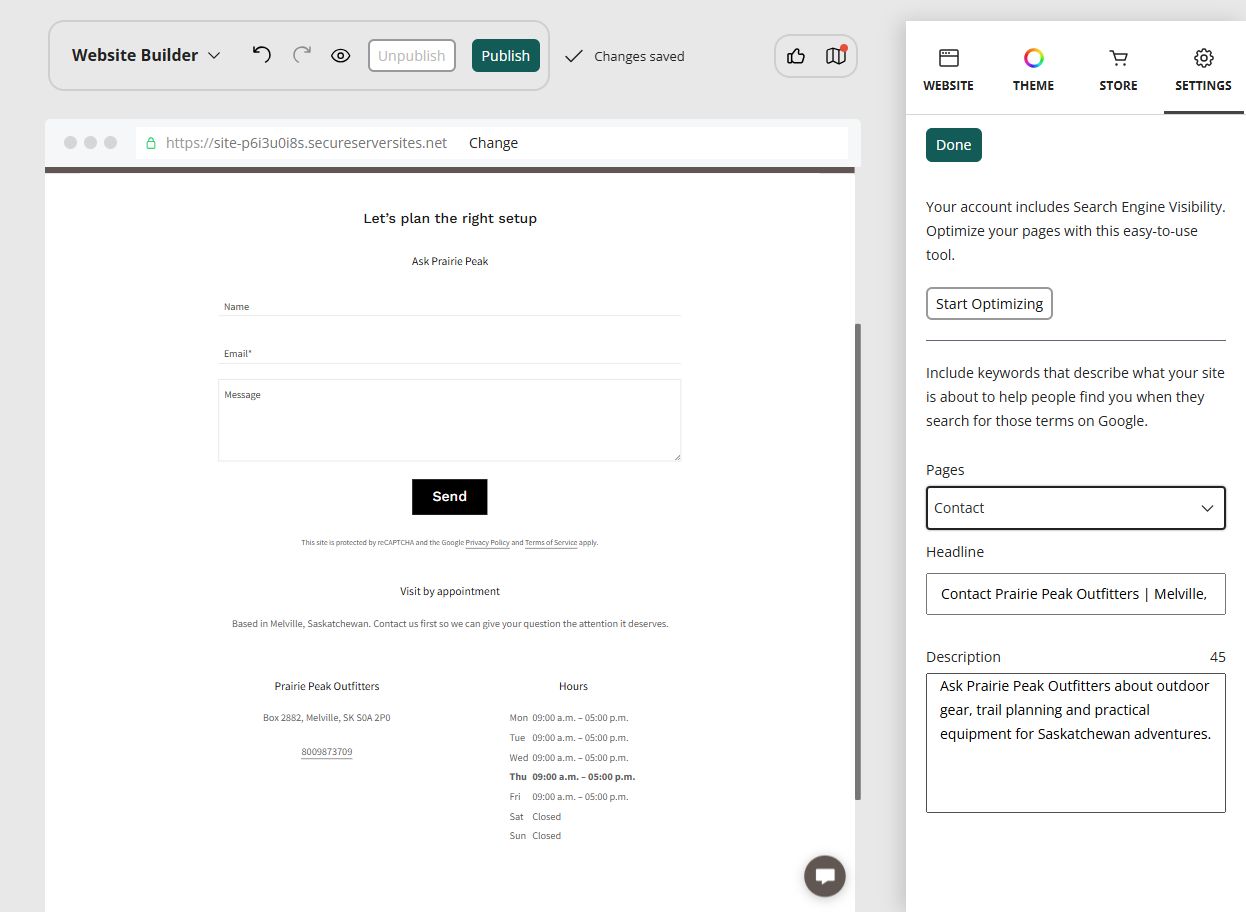
Open Settings → SEO Settings, choose a page and describe its specific purpose. A good search title names the page, business and location without repeating a list of keywords.
  • Give each page a distinct title.
  • Write descriptions for people, not search engines.
  • Match the words to the visible page content.
  • Review the fields whenever the page purpose changes.
Website Builder SEO settings with a search title and description for the Prairie Peak Outfitters contact page
Page-level SEO fields turn a generic result into a clear invitation from the right business.
BUSINESS 2

Use PayPal for one clear product or service.

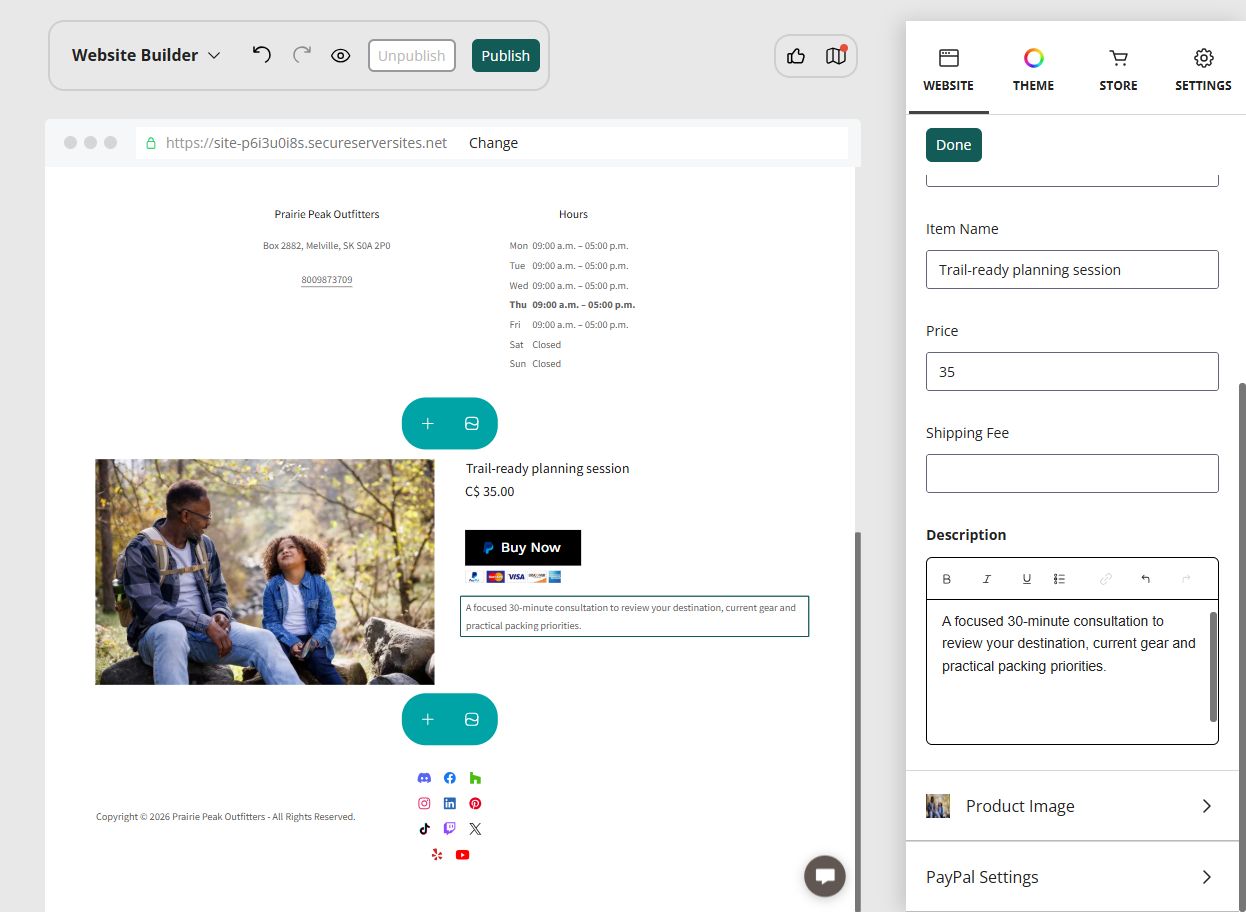
Add a PayPal Button section when customers need to purchase a single service without browsing a store. Prairie Peak Outfitters uses it for a C$35 trail-ready planning session.
  • Name the service and explain exactly what is included.
  • Set the correct currency, price and any applicable fee.
  • Connect the business PayPal account before publishing.
  • Complete a small test purchase and confirm the receipt.
Website Builder editor configuring a PayPal button for a trail-ready planning session
A focused payment button works for a consultation or service; a growing catalogue belongs in the Online Store plan.

Business Plus plan

Turn the website into a place customers can follow and book.

Business Plus builds on the Business-plan site with social connections and appointment scheduling. Use these tools only where they make the customer journey simpler.

BUSINESS PLUS 1

Connect the social profiles the business actively maintains.

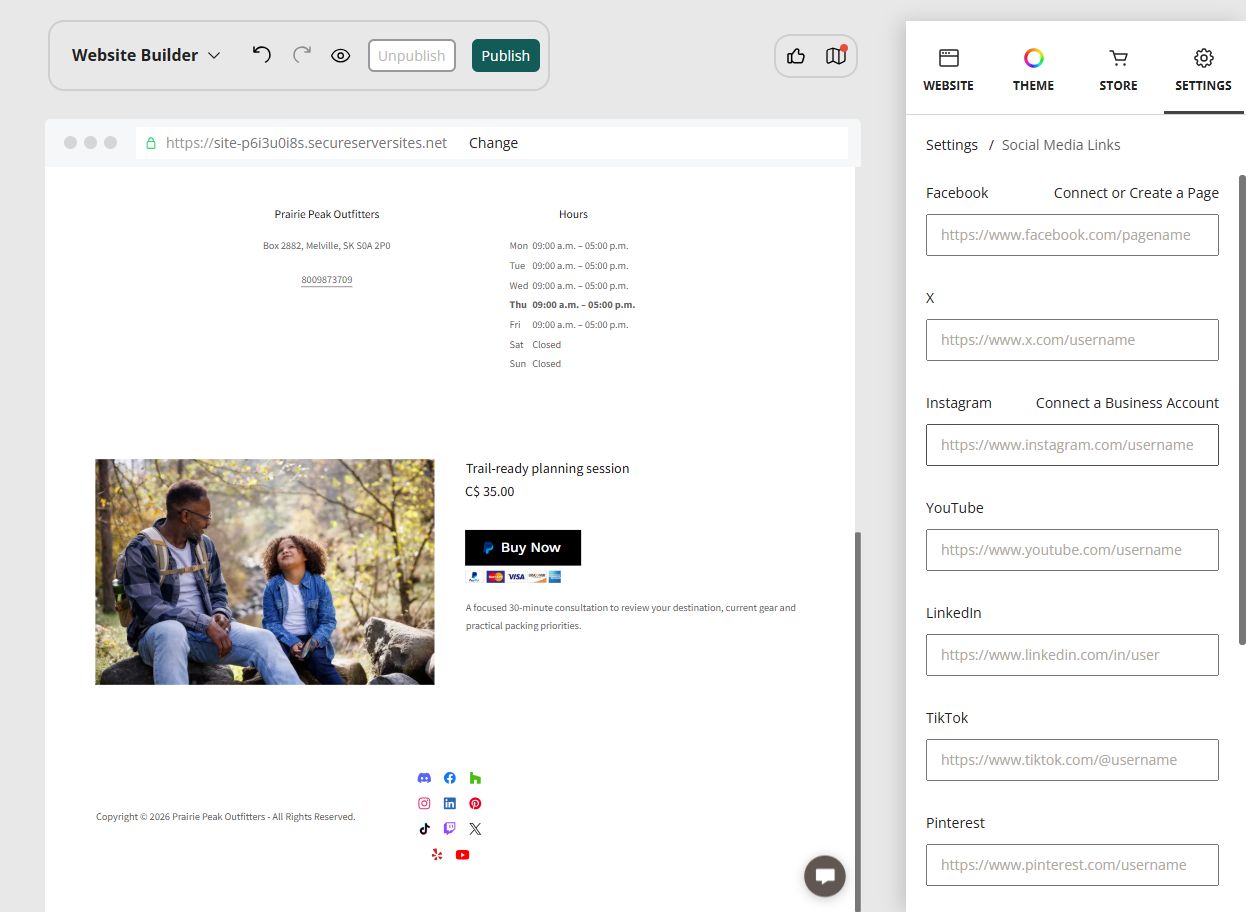
Open Settings → Social Media Links and enter the full public profile address for each network. Empty networks should stay empty so customers never reach unfinished profiles.
  • Use business profiles rather than personal accounts.
  • Confirm every link opens the intended public page.
  • Keep profile names, imagery and contact details consistent.
  • Focus on a few maintained channels instead of displaying every icon.
Website Builder social media link settings for Facebook, Instagram, YouTube, LinkedIn and other networks
The editor supports major social networks without requiring every field to be completed.
BUSINESS PLUS 2

Add online appointments for a service customers can schedule.

Select Scheduling → Online Appointments, choose a gallery or category layout, and create a clearly defined service. Set the duration, price, payment method, location and availability before accepting bookings.

  • Use a specific service name and concise description.
  • Allow enough time between appointments.
  • Connect video-conference details only through a trusted business account.
  • Book a test appointment and verify confirmations, time zone and cancellation rules.
TROUBLESHOOTINGDo not publish an empty or errored appointment section.

If the service preview fails to load, remove the unfinished section, reopen the appointment manager and confirm the service exists before adding it again.
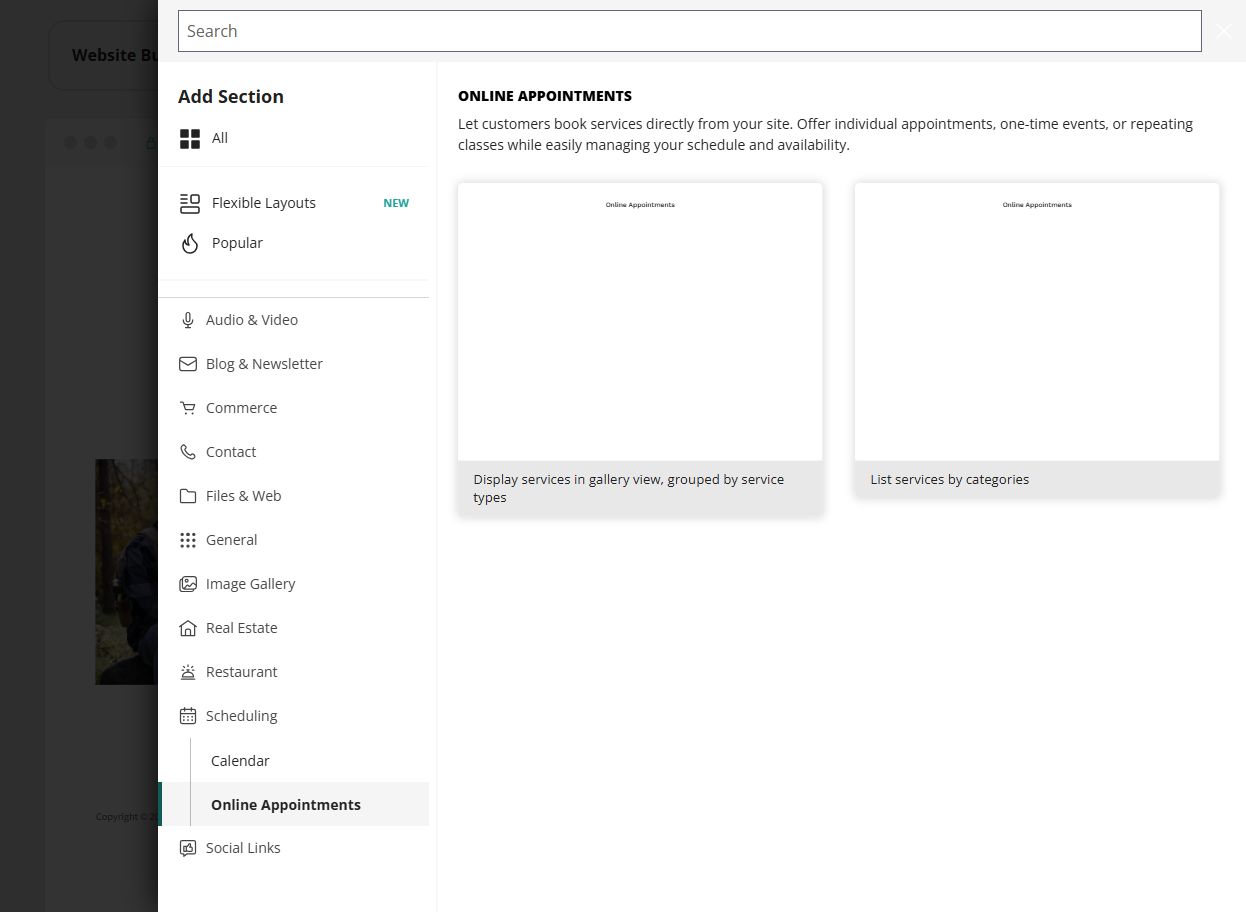
Website Builder Online Appointments section offering gallery and category layouts
The layout is only the presentation layer; the underlying service, schedule and notifications must also be configured.
BUSINESS PLUS 3

Create the staff profile before saving the first service.

Every appointment needs a staff member who can deliver it. Add a staff name, short specialty and availability, then assign that person or team to the service.

  • Email is optional unless the staff member needs booking notifications.
  • Keep staff availability aligned with the business hours.
  • Choose one staff member when the appointment is always handled by the same person.
  • Offline payment can be used without connecting a payment processor.
EXAMPLETrail-ready gear consultation

30 minutes, C$35, handled by the Prairie Peak Team at the customer's location.
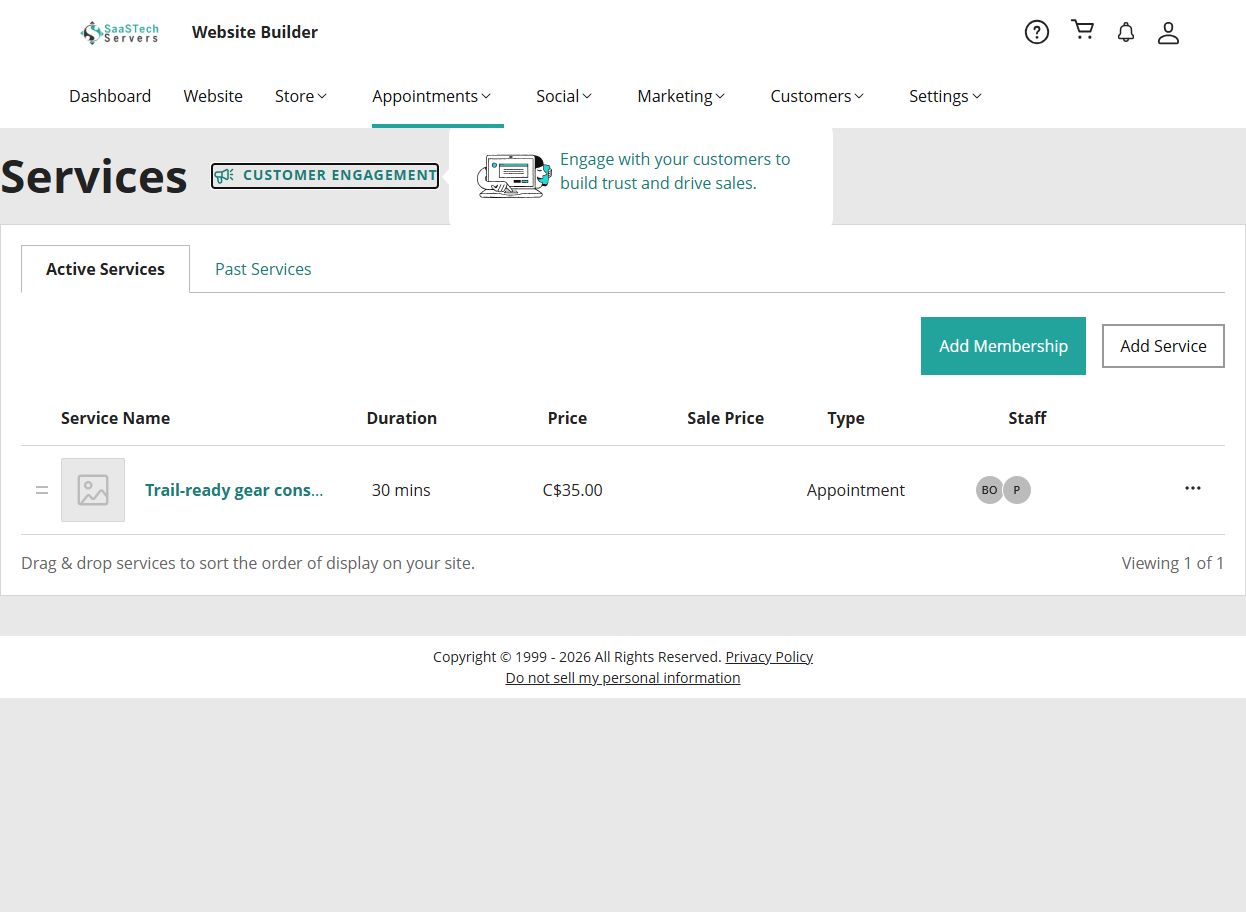
Online Appointments service list showing a 30-minute Trail-ready gear consultation priced at 35 Canadian dollars
A successfully saved service appears in Active Services with its duration, price, type and assigned staff.
BUSINESS PLUS 4

Set hours that customers can rely on.

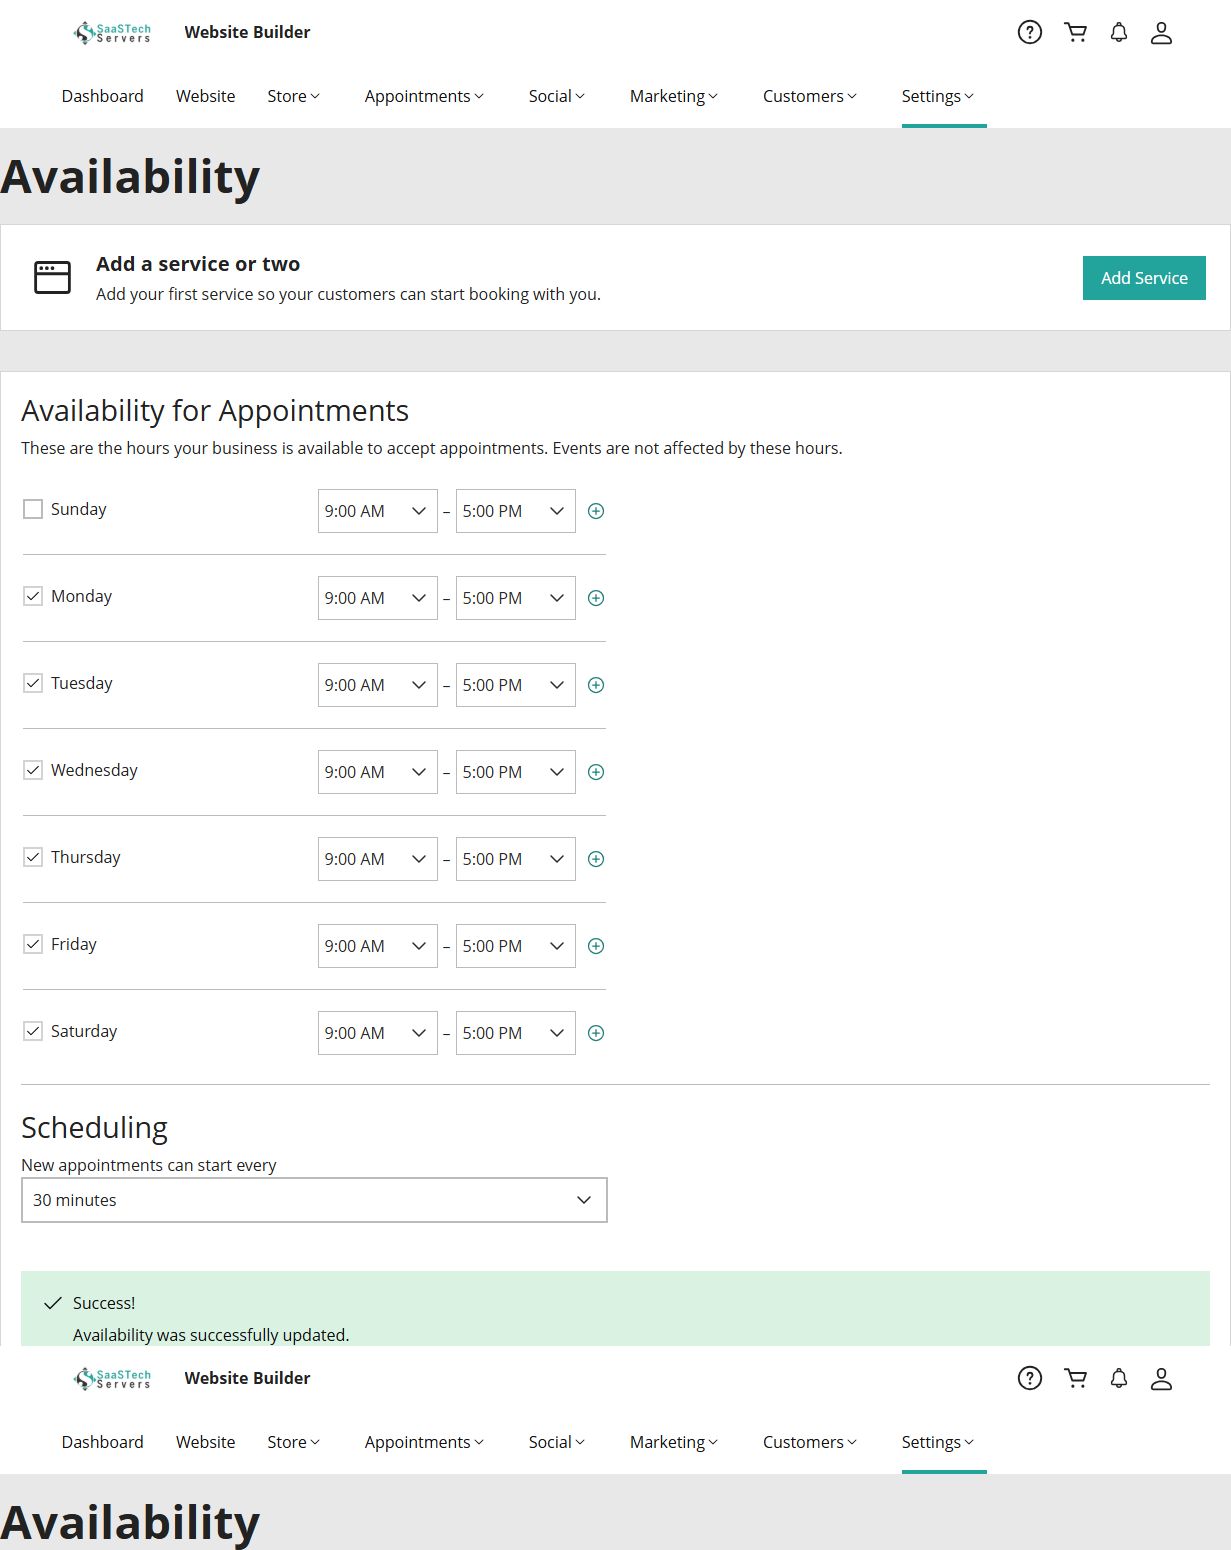
Open Settings → Availability and define when appointments may begin. These hours control appointments rather than special events.
  • Close days when nobody is available.
  • Use appointment intervals that match the service duration.
  • Leave room for preparation, travel and follow-up.
  • Review staff-level availability whenever schedules change.
Online Appointments availability settings with weekday hours, Sunday closed and 30-minute scheduling intervals
Prairie Peak Outfitters accepts appointments Monday through Saturday and starts new bookings every 30 minutes.
BUSINESS PLUS 5

Prepare customers before the appointment.

Confirmations are emailed automatically. In Communications, choose whether to add SMS confirmations and email or SMS reminders. In Booking Info, ask only questions that help deliver the service.

  • Send reminders early enough for customers to reschedule responsibly.
  • Explain any message charges or consent requirements before using SMS.
  • Keep questions short and relevant to the appointment.
  • Avoid requesting sensitive information in an ordinary booking form.
REQUIRED QUESTIONWhat trail or activity are you preparing for?

This gives the advisor useful context without turning the booking form into a long questionnaire.
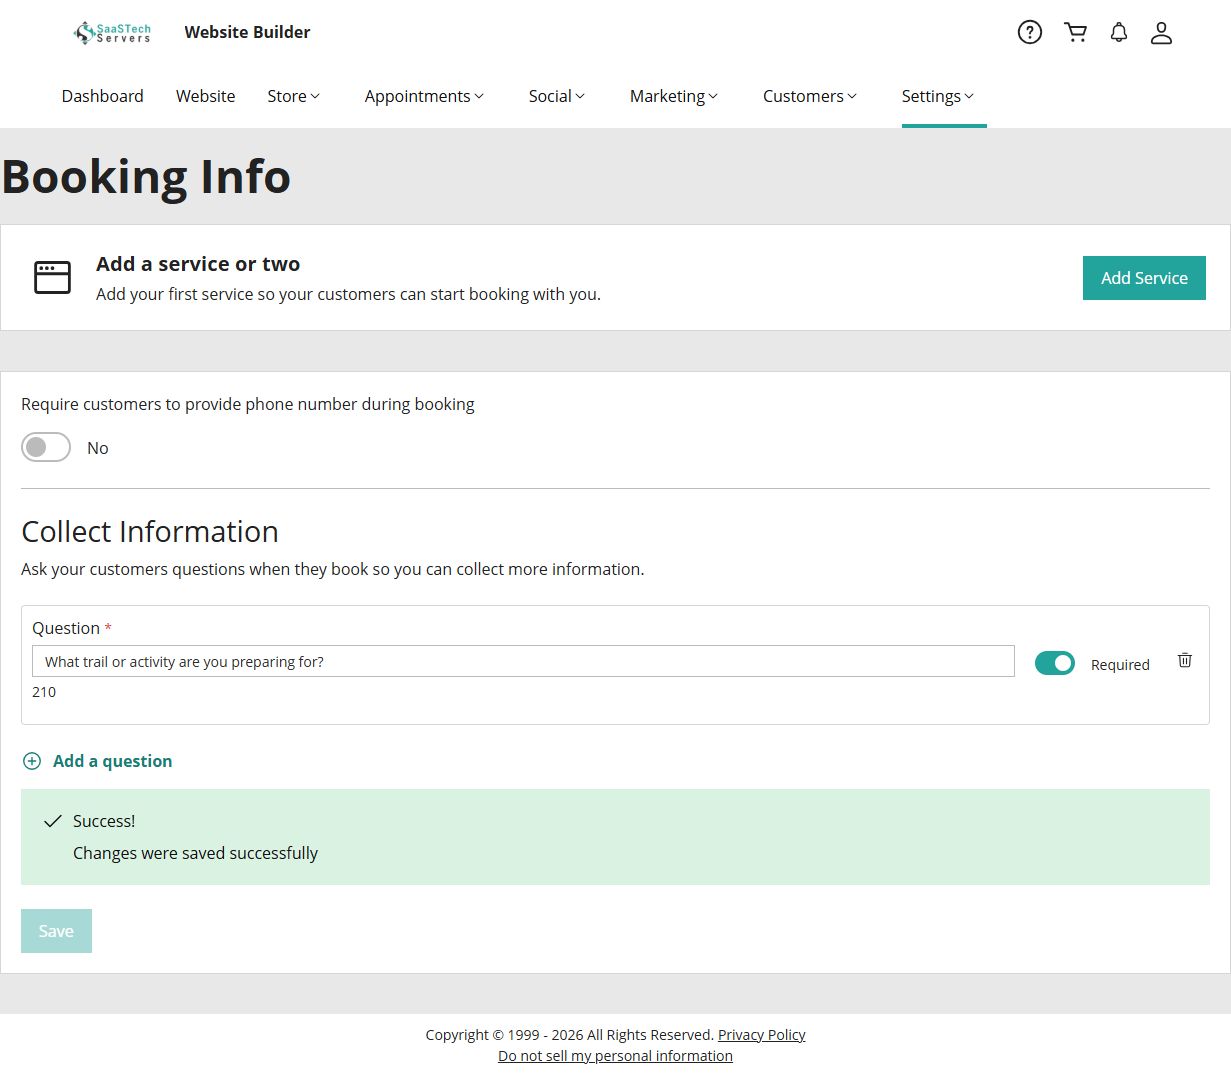
Online Appointments booking information settings with a required question about the customer's planned trail or activity
A focused question helps the business prepare while keeping booking quick for the customer.
BUSINESS PLUS 6

Review confirmations and reminders before accepting bookings.

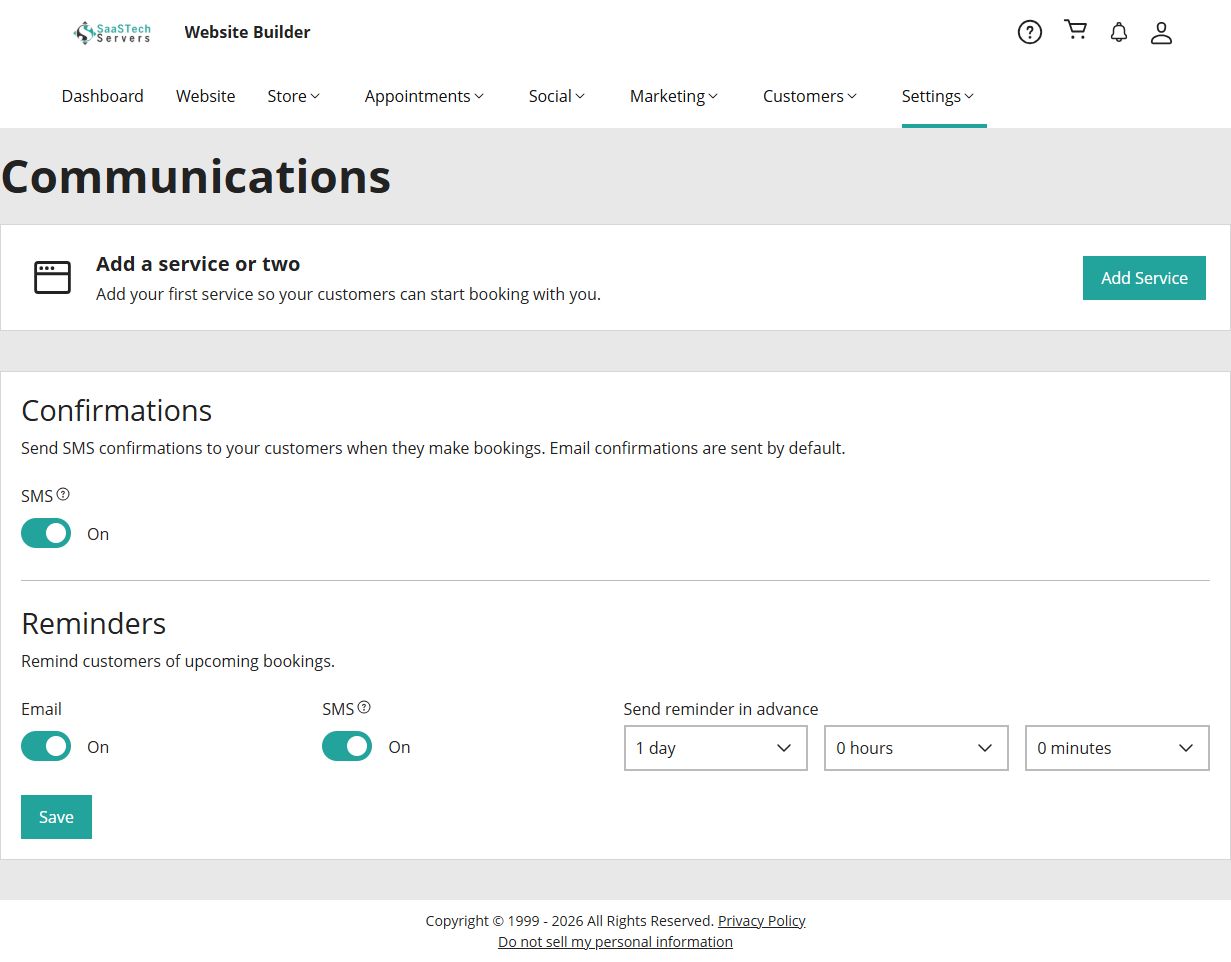
The demonstration account sends confirmations and schedules reminders one day before the appointment. Check these settings before the first real customer books.
  • Verify the business time zone.
  • Confirm the sender name and reply address.
  • Make cancellation and rescheduling instructions easy to find.
  • Complete one test booking without a charge before publishing.
Online Appointments communications settings showing confirmations and one-day advance reminders
Consistent confirmation and reminder settings reduce missed appointments and customer uncertainty.
BUSINESS PLUS 7

Walk through the appointment as a customer.

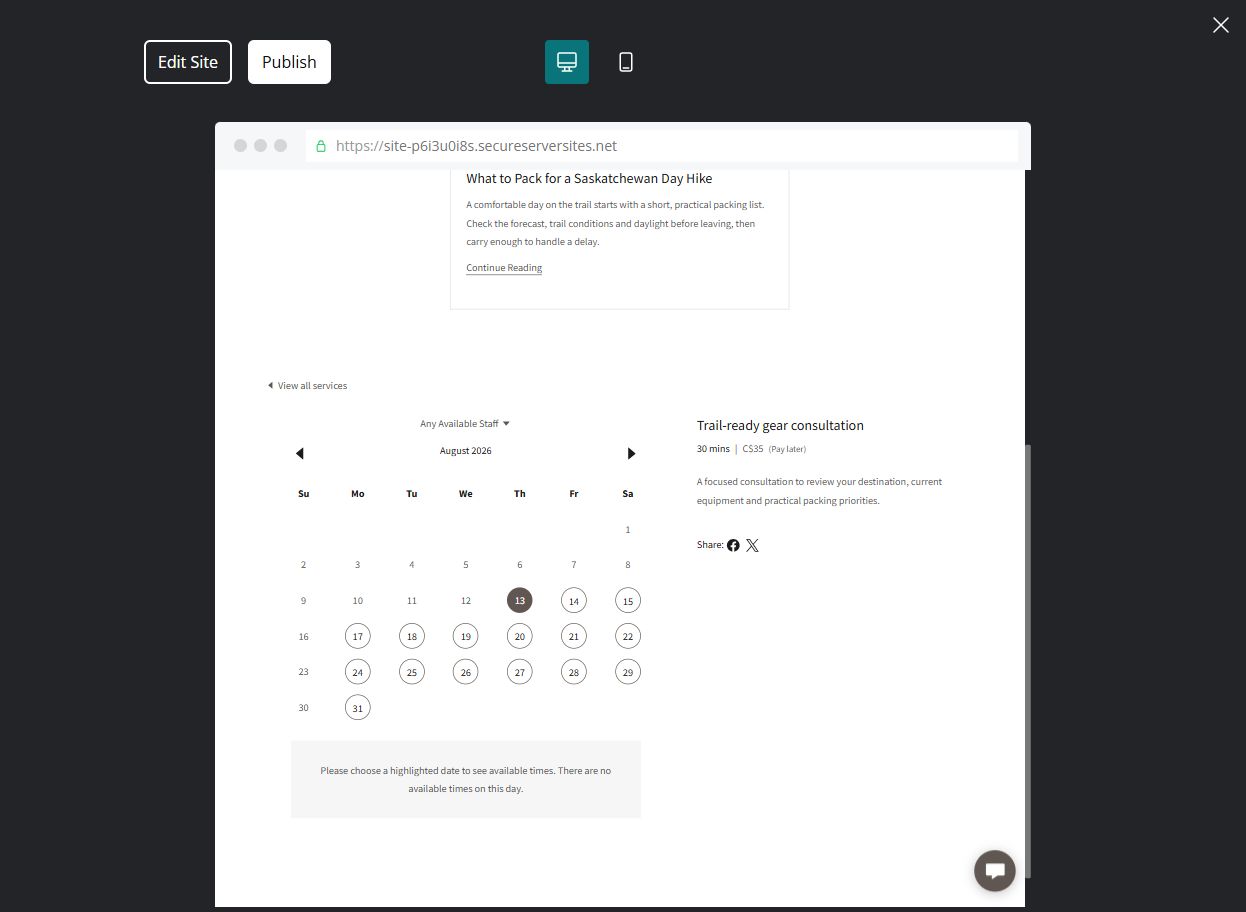
Select Preview, open the appointment section and choose Book. The customer can select any available staff member or a specific team member, then choose a highlighted date and time.
  • Confirm the correct time zone appears above the available times.
  • Check that the expected morning and afternoon slots are offered.
  • Make sure the service name, duration, price and payment timing are clear.
  • Test the experience at desktop and mobile widths.
Customer appointment calendar for a Prairie Peak Outfitters consultation with available dates and times
The customer preview confirms that staffing, availability and Saskatchewan time-zone settings work together.
BUSINESS PLUS 8

Review the final booking details without creating a false appointment.

After choosing a time, continue to the customer-information step and verify every required field. A service delivered at the customer's location asks for an address before booking.

  • Check that the selected staff member, date, time, duration and price remain visible.
  • Ask only for information required to deliver the service.
  • Website Builder preview keeps the final Book button disabled.
  • After publishing, make one controlled test booking and cancel it from the appointment calendar when verification is complete.
PREVIEW LIMITATIONNo real appointment is created from this preview.

The disabled final button lets the site owner inspect the journey safely. A true end-to-end confirmation test must be performed on the published site.
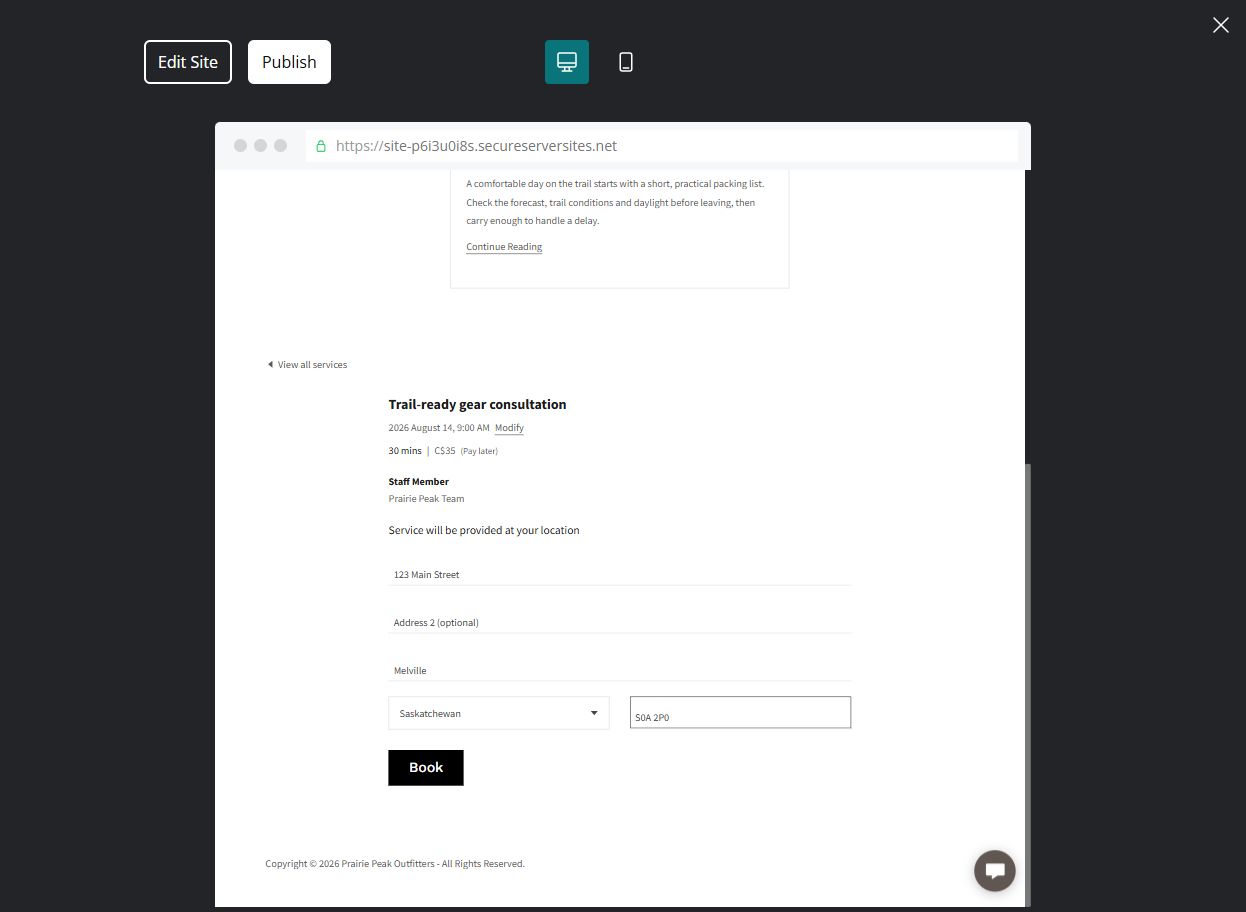
Customer appointment form showing the selected service, staff member and address fields with the Book button disabled in preview
Review the final step for clarity before allowing a real customer to submit it.

Online Store plan

Build a catalogue customers can understand and trust.

The Online Store plan adds product listings, inventory, shipping, payments and a complete cart. Start with a small, polished catalogue before configuring checkout.

ONLINE STORE 1

Start with a complete product record.

Open Store → Products and edit one product at a time. Give every item a customer-friendly name, accurate price, unique SKU and concise description before working on inventory or shipping.

  • Use a consistent SKU format that staff can recognize.
  • Describe the product's purpose and practical benefits.
  • Choose the correct physical or digital product type.
  • Keep unfinished products hidden until their details are complete.
EXAMPLE PRODUCTNorthern Camp Lantern — C$44.99

A compact rechargeable lantern with adjustable brightness and a warm low-light mode for tents, cabins, patios and emergency kits.
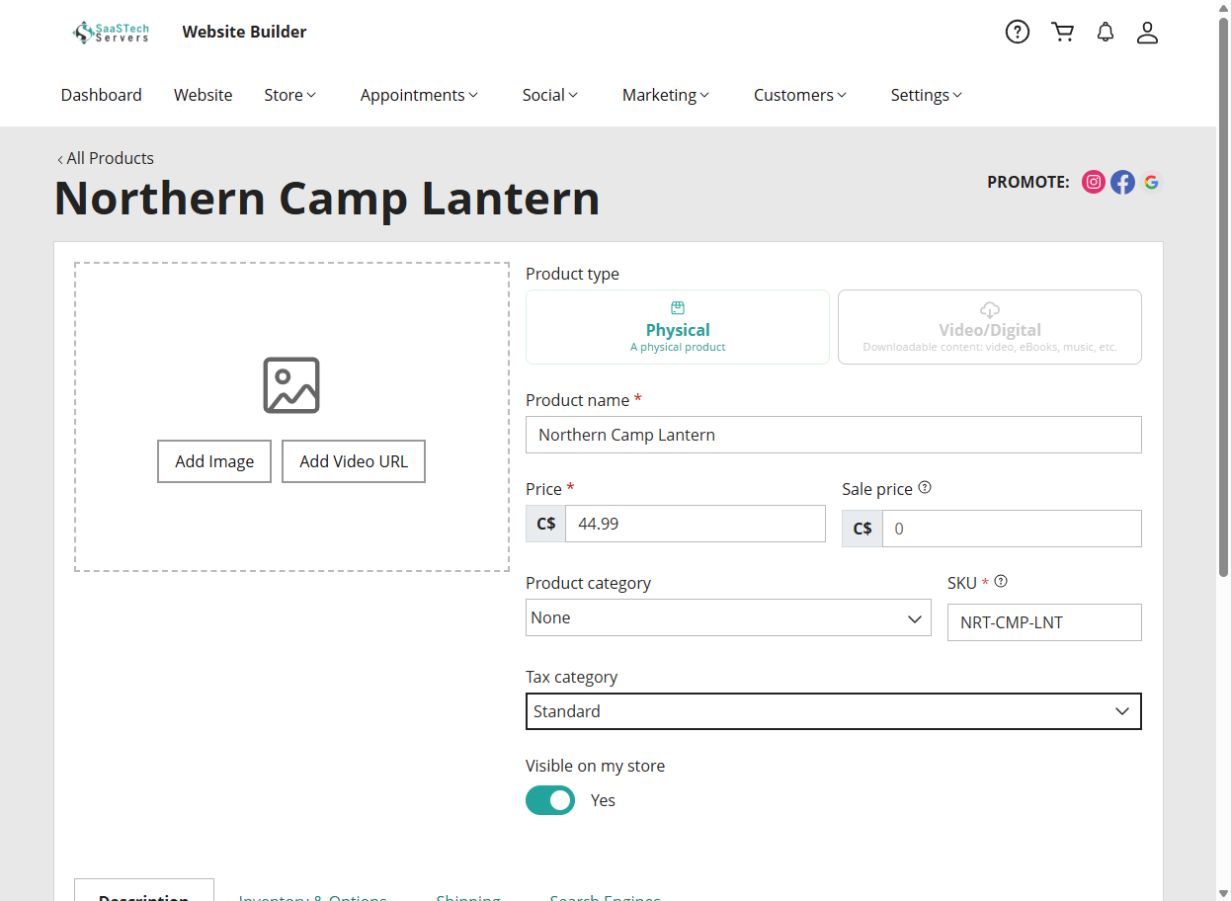
Online Store product editor for the Northern Camp Lantern with its price, SKU and description
The product editor keeps the core listing, inventory, shipping and search settings together.
ONLINE STORE 2

Add a clear main product image.

Select Add Image, upload the product photograph to the media library, select it and choose Insert. The first image becomes the main catalogue image.
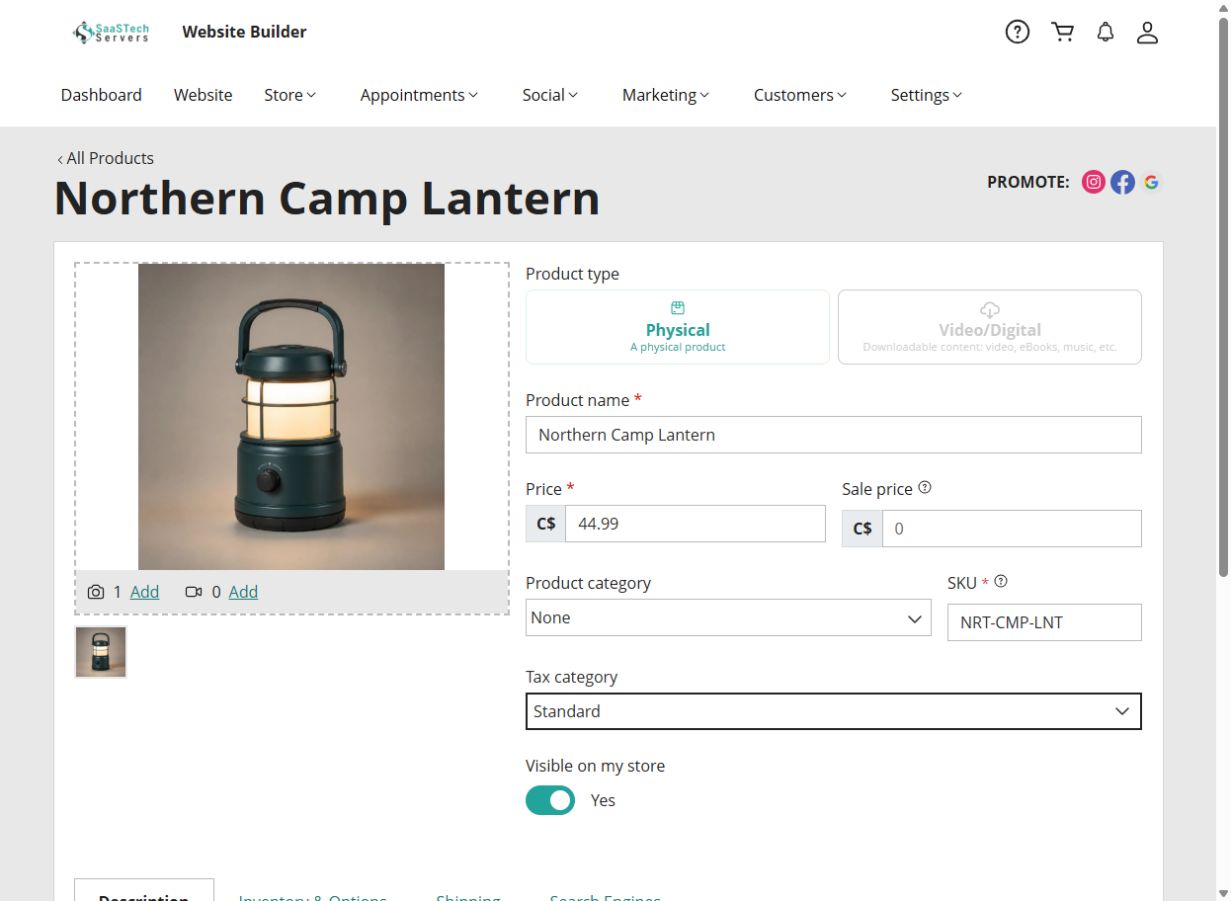
  • Use a square or consistently cropped image across the catalogue.
  • Show one product clearly against an uncluttered background.
  • Avoid decorative text, watermarks and misleading accessories.
  • Save the product after confirming the image count and listing details.
Northern Camp Lantern product editor after adding a professional square product image
A consistent product photograph makes the catalogue easier to scan and gives the listing a finished retail appearance.
ONLINE STORE 3

Track stock before the first order.

Open Inventory & Options, enable inventory tracking and enter the quantity currently available. Add a low-inventory threshold that gives the business enough time to reorder.
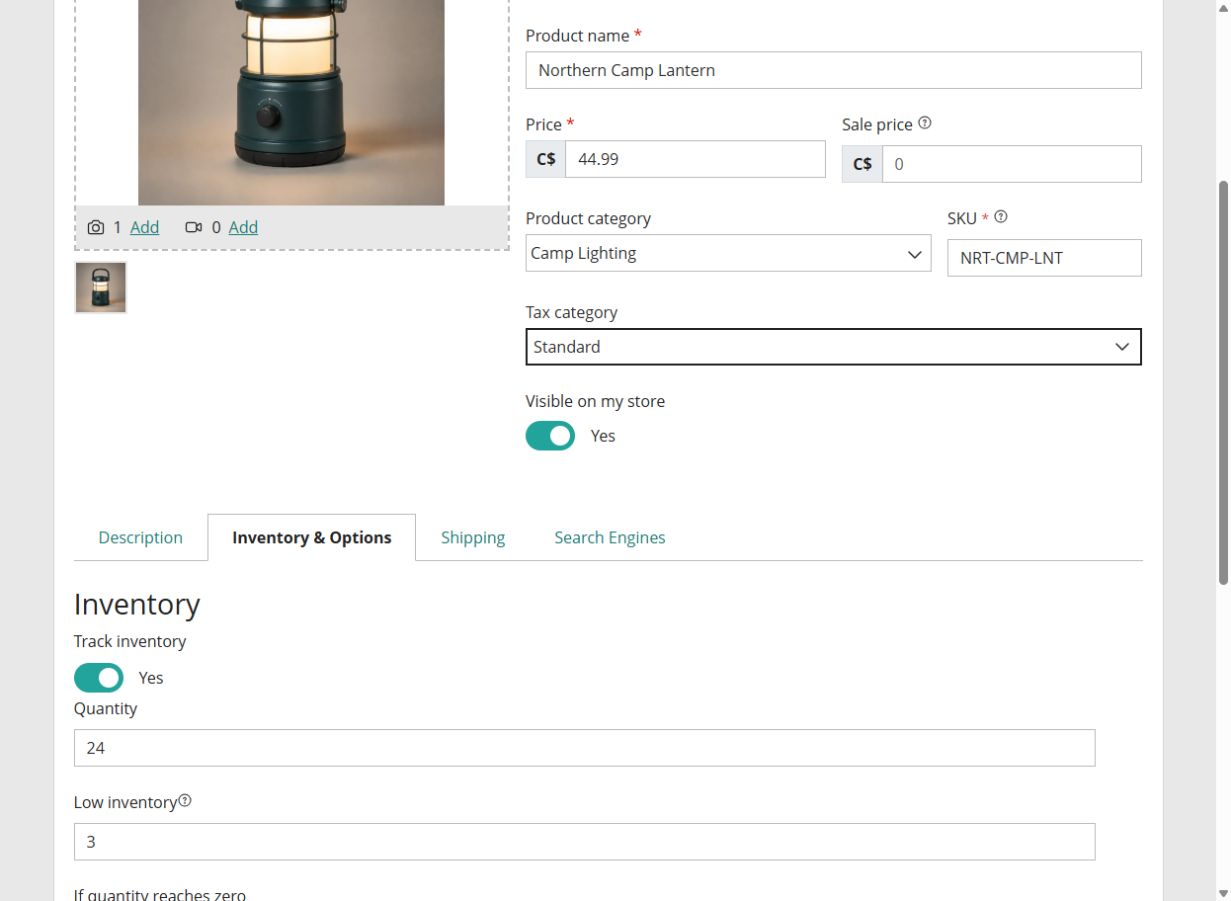
  • Prairie Peak Outfitters begins with 24 lanterns.
  • The low-stock warning is set to three units.
  • Backorders are disabled so unavailable stock cannot be oversold.
  • Use options only when one product genuinely has sizes, colours or other variations.
Northern Camp Lantern inventory settings with 24 units, a low-stock threshold of three and backorders disabled
Accurate opening quantities make order and low-stock notices useful from the first sale.
ONLINE STORE 4

Enter the packed shipping size.

Open Shipping and enter the weight and dimensions of the package the carrier will handle—not only the bare product. These values support dimension-based shipping calculations.
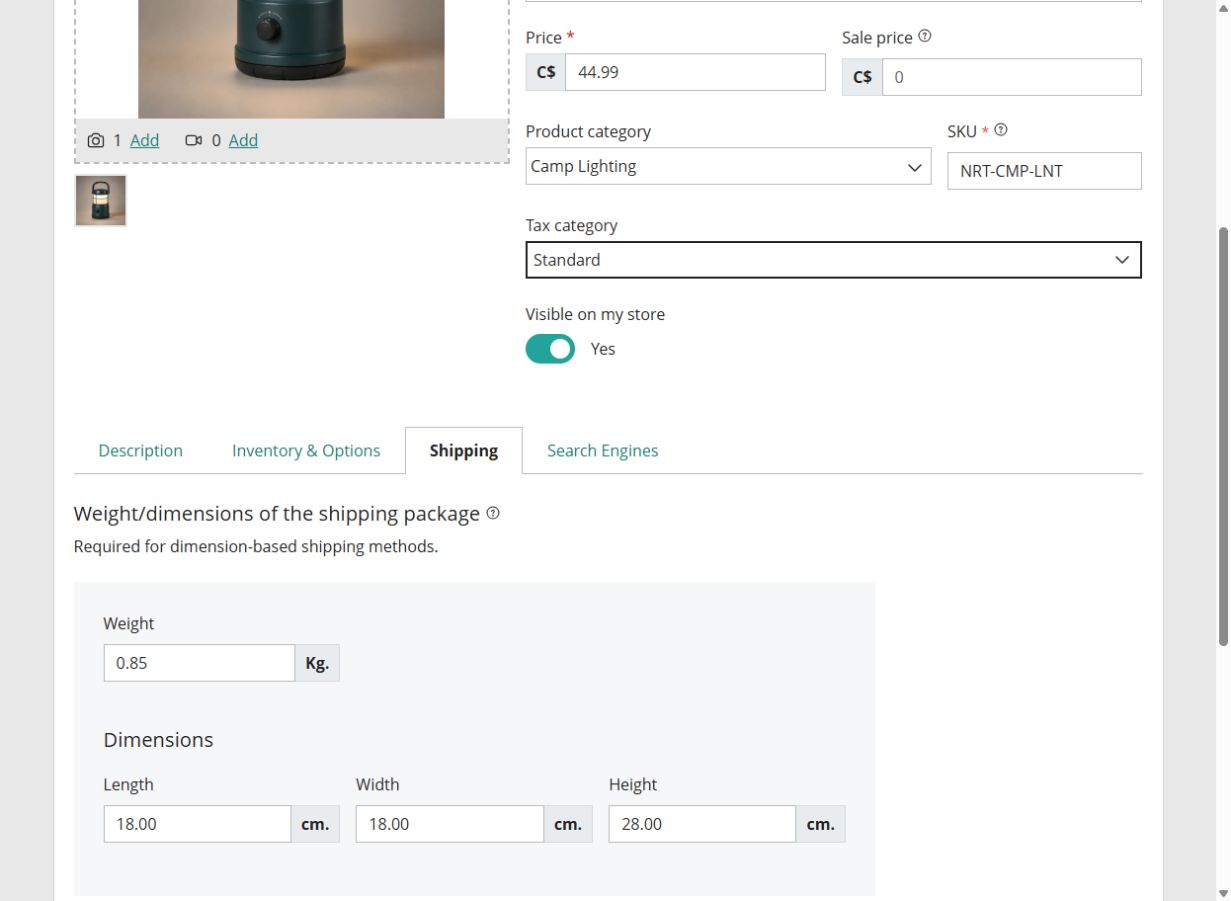
  • Lantern package weight: 0.85 kg.
  • Package dimensions: 18 × 18 × 28 cm.
  • Use the store's configured shipping methods for the rate.
  • Measure the final box again before selling a real item.
Northern Camp Lantern shipping settings with package weight and dimensions
Package measurements should include the box and protective material to avoid inaccurate shipping rates.
ONLINE STORE 5

Organize the catalogue and keep the product address readable.

Create a focused category such as Camp Lighting and assign the product to it. Under Search Engines, use a short product link made from meaningful words.
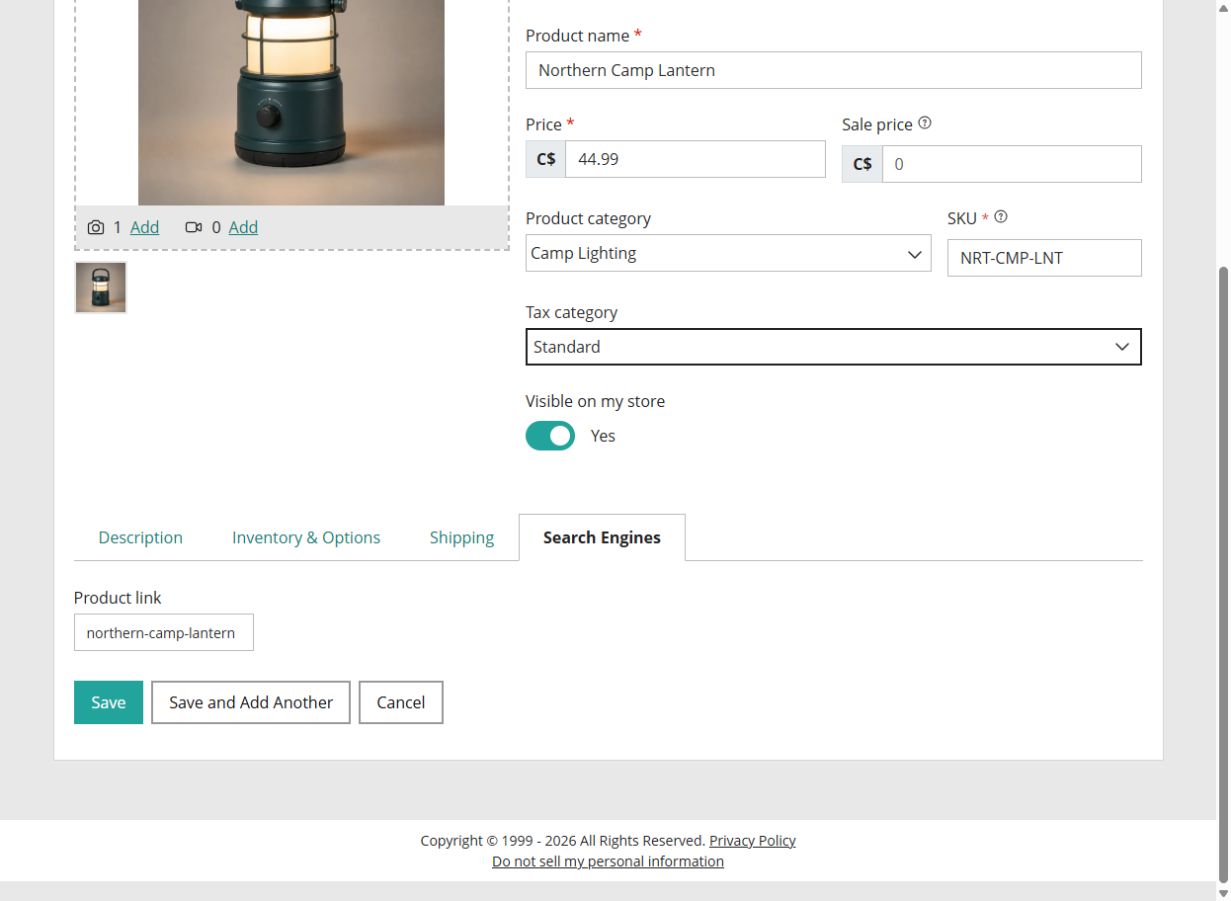
  • Use categories customers would naturally browse.
  • Avoid placing one product in several unrelated categories.
  • Keep the link concise: northern-camp-lantern.
  • Do not change a published product link casually; old links may already be shared or indexed.
Northern Camp Lantern search-engine settings with a readable product link
A clean product address is easier to recognize, share and maintain.
ONLINE STORE 6

Offer a shipping choice that works for small and larger orders.

Open Settings → Shipping and define the delivery method customers will see during checkout. A threshold can reward larger orders without making smaller orders impossible to complete.

  • Prairie Peak Outfitters charges C$9.99 for Canadian orders below C$75.
  • Canadian orders of C$75 or more receive free shipping.
  • Confirm the ship-from postal code before relying on any calculated rate.
  • Add local delivery or pickup only when the business can fulfil it consistently.
CUSTOMER-FACING MESSAGEFree shipping if your order is C$75 or more.

Show the threshold in the cart so customers understand how close they are to qualifying.

ONLINE STORE 7

Connect payments, then configure tax with qualified advice.

Open Settings → Payments and connect the business payment account. Prairie Peak Outfitters uses PayPal; Square and Stripe are also available. Never place personal credentials in product descriptions or page content.

  • Confirm the connected payment account belongs to the business.
  • Review transaction fees and payout timing before launch.
  • Enable tax collection only after confirming where the business must register, collect and remit.
  • Keep tax settings current as products, locations and regulations change.
SETUP BOUNDARYPayment connection and tax registration require the business owner.

The editor can prepare the store, but financial credentials and tax obligations must be confirmed by an authorized person.

ONLINE STORE 8

Add the Shop page and test the customer journey.

Create a Shop page, add the Commerce → Online Store section and keep it visible in navigation. Publish the draft, then follow the same path a customer will use.

  • Open a category and a product detail page.
  • Add one product to the cart and adjust its quantity.
  • Confirm the cart shows the correct subtotal and shipping threshold.
  • Continue to checkout without submitting a real payment until the store is ready for a controlled test order.
STOREFRONT CHECK

Build with confidence

Start with a complete draft. Improve it one decision at a time.

Explore Website Builder
Display
Text size
Appearance